Feb 27, 2013

MXNEC M307 MT6577 S3 CLONE


I have MT6577 MXNEC BRAND MODEL 307 DECLARED S3 CLONE. Gentoo Linux machine recognized as HTC
x11@gentoo : lsusb
  • Bus 001 Device 002: ID 8087:0024 Intel Corp. Integrated Rate Matching Hub
  • Bus 002 Device 002: ID 8087:0024 Intel Corp. Integrated Rate Matching Hub
  • Bus 001 Device 001: ID 1d6b:0002 Linux Foundation 2.0 root hub
  • Bus 002 Device 001: ID 1d6b:0002 Linux Foundation 2.0 root hub
  • Bus 001 Device 003: ID 0a5c:4500 Broadcom Corp. BCM2046B1 USB 2.0 Hub (part of BCM2046 Bluetooth)
  • Bus 001 Device 004: ID 0ac8:c412 Z-Star Microelectronics Corp.
  • Bus 002 Device 003: ID 17ef:602e Lenovo
  • Bus 002 Device 004: ID 17ef:602d Lenovo
  • Bus 002 Device 007: ID 0bb4:0c03 HTC (High Tech Computer Corp.)
  • Bus 001 Device 005: ID 0a5c:4502 Broadcom Corp. Keyboard (Boot Interface Subclass)
  • Bus 001 Device 006: ID 0a5c:4503 Broadcom Corp. Mouse (Boot Interface Subclass)
Windows 7 x64 Machine recognized as SAMSUNG ..... LOL


SAMSUNG ... ???


No Doubt .... Windows Machine it self declared as GENUINE .... LOL ; but It is NOT


GENUINE ...... LOL

TOO MANY FAKE IN THE WORLD ....
MXNEC 307 is good phone with 2500 mAh battery, dual core Arm 7, 512 MB Ram, 8 MP Camera serving DUAL SIM CARD GSM-GSM.

Feb 26, 2013

Galaxy Nexus GT-i9250 Ubuntu Phone OS

Ubuntu For Phone Developer Preview have been released on 21st February 2013. I'm not a developer, but there is nothing can stop me to follow developer folks to enjoy the preview. Since I have exactly a device support by ubuntu phone ... the official name is Ubuntu Touch
  1. Pre Conditions of Ganex
    • Stock ROM from google Android Jelly Bean 4.1.1
    • Locked Bootloader
    • Unrooted
  2. Preparing For Flashing
    • Unlock Bootloader
    • Unlocking bootloader for windows users will be very easy by downloading free of charge a TOOLKITS applications build by SKIPSOFT and for guide and instruction XDA FORUM for Galaxy Nexus is the best guide. Go and grab the toolkit. Unfortunately, I'm a linux user and can not use the Toolkits, however manual unlocking Ganex bootloader is easier and simpler in Linux.
      1. Set up ADB and FASTBOOT read and grab from Google Code or You can follow any guide from your linux distro specific
      2. Set up USB Drivers for Galaxy Nexus
      3. On linux, usb drivers for Galaxy Nexus, Please copy paste the following, into a file /etc/udev/rules.d/99-android.rules, you put any number before -android[DOT]rules. i.e 55-android.rules
        • # SAMSUNG GALAXY NEXUS FASTBOOT SUBSYSTEM=="usb", ATTR{idVendor}=="04e8", ATTR{idProduct}=="6860", MODE="0666", GROUP="plugdev"
        • # SAMSUNG GALAXY NEXUS ADB SUBSYSTEM=="usb", ATTR{idVendor}=="04e8", ATTR{idProduct}=="685c", MODE="0666", GROUP="plugdev"
      4. Boot Galaxy Nexus into FASTBOOT MODE, to achieve fastboot mode. Turn off Galaxy Nexus, Push and Hold Up and Down Volume Button and Power Button simultaneously, Galaxy Nexus will be on fastboot mode with BIG ICON word START

        Galaxy Nexus Fastboot Mode
      5. Connect Galaxy Nexus on Fastboot mode to PC (with adb and fastboot alive)
      6. Open terminal and excute command : $ fastboot oem unlock and You need to accept the option in the device, use volume up / down to choose and power button to select


        Accept Unlock Option Galaxy Nexus
      7. You Just Void your Warranty and Bootloader Unlocked. In the terminal execute : $ fastboot reboot, to reboot Galaxy Nexus
    • Flash Custom Recovey (CWM) For Galaxy Nexus
      1. Download Cloackwork Recovery for Galaxy Nexus (Maguro) from Mediafire, save somewhere in your home folder
      2. Boot Galaxy Nexus into Bootloader and connect to PC via USB Port
      3. Open terminal, navigate into downloaded Maguro Recovery file named : recovery-clockwork-6.0.0.5-maguro.img
      4. Execute command : $ fastboot flash recovery recovery-clockwork-6.0.0.5-maguro.img
      5. Reboot Galaxy Nexus : execute terminal command : $ fastboot reboot
      6. Now Galaxy Nexus have Customs Recovery
    • Boot Galaxy Nexus into Recovery
    • Achieve Galaxy Nexus into Fastboot Mode > using Volume Up button, choose RECOVERY


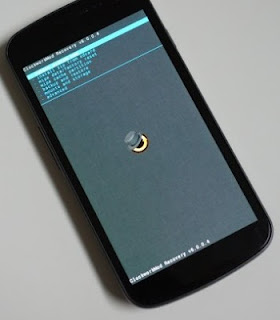
      Galaxy Nexus in Recovery Mode


      Use Volume button to choose any options in Galaxy Nexus; Firs, better to do BACK UP.
    • Flashing Ubuntu Touch into Galaxy Nexus
      1. Download Zip file named quantal-preinstalled-armel+maguro.zip and quantal-preinstalled-phablet-armhf.zip from Ubuntu CD Image Center save both file into home user folder
      2. Copy Both File into Internal Storage in Galaxy Nexus
      3. Since Samsung Galaxy Nexus, (Third Google Nexus Device), MTP (Media Transfer Protocol) is applicable, thus NO USB Storage option in Galaxy Nexus. mtpfs is needed to copy files from pc into Galaxy Nexus mnounted as Media Device
        In Gentoo Linux, mtpfs need to be install and mount from terminal : create mount point by execute $ sudo mkdir /mnt/gnex (root previlege is required), to mount execute terminal command : $ sudo mtpfs -o allow_other /mnt/gnex
      4. By using file manager, copy both ubuntu touch images into /mnt/gnex
      5. Boot Galaxy Nexus into Clockwork Recovery
      6. Perform Data/Factory Reset
      7. Flash both ubuntu-quantal image zipped file into device
      8. Once flashing finished; reboot Galaxy Nexus
      9. Completed : Samsung Galaxy Nexus RUN Ubuntu Touch/phone
  3. Samsung Galaxy Nexus Running Ubuntu Touch


    Galaxy Nexus Running Ubuntu Touch
  4. Ubuntu Touch on Samsung Galaxy Nexus Review
    • Far away from the smoothness showing on YouTube / Video Releases, this developer preview
    • Wifi connection Works
    • GSM Calling / Texting sms works
    • GPRS/ Data Connection NOT WORK
    • No option To close running applications
    • No Google Sync for Contact, but you can add contact manually
    I did not try much, but looks promising for New Comer of ALL IN ONE OS, ubuntu said This ubuntu touch is seamless OS for Smart Phone, Tablet and PC
  5. Trouble
    • MTP is Not active on ubuntu touch, thus no option to mount (as Media Device or USB Storage) Galaxy Nexus Running Developer Preview of ubuntu touch
    • Adb Interface access is alive on Galaxy Nexus running ubuntu touch, this is kind of funny, in which a device running ubuntu but accessible by adb (Android Debug Bridge) command, instead of UDB (Ubuntu Debug Bridge)
    • To copy a file into internal storage og Galaxy Nexus Running Ubuntu touch ... (Let say we need to send android custom rom into internal storage for flashing via Clockwork Recovery), an ADB Terminal command is required : $ adb push FileName[DOT]zip /sdcard/
    • Boot Galaxy Nexus into Recovery and flash any android ROM to return Galaxy Nexus into Android Device
  6. Let us waiting "Stable" released of Ubuntu Touch to make Galaxy Nexus device usable for daily device

Real Multilib Userland on Linux

Read multilib requirement on Android rom building and other stuff. About two years absent from getting rid with android rom. I have time to...