Jul 19, 2014

MyPhone Zenith My403 Series

Intertec ( salah satu vendor Smart Phone asal Indonesia ) merilis produk bertajuk "MyPhone". Sebagai BUKAN SEORANG TECH SAVVY, sedikit kebingungan dengan detil Produk ini. Code "8225" bukan mudah dipahami awam. Ketertarikan saya pada produk ini karena dalam "Iklan" disebutkan device ini berplatform "msm8225".

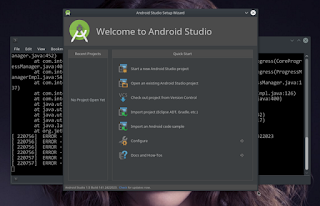
Namun saat My403 device dihubungkan ke PC, untuk sedikit mengenali "Hardware", muncul kebingungan. Dengan setelan "Android Debug (ADB)" aktif, Mesin LinuxMint 17 amd64 mengenali port USD sebagai "Mediatek", tidak salah lagi Vendor ID : "0e8d" adalah MediaTek atau dikenal sebagai MTK. ADB Daemon pun "Tidak Mengenali" device ini ....
  1. Tinjauan Umum Hardware
  2. Myphone Zenith Series My403. Spesifikasi "Dasar" Hardware My403 "agak" sesuai dengan spesifikasi yang diinformasikan situs Qualcomm, kecuali pada "DUKUNGAN RESOLUSI"


    "Ketidak Sesuaian ini "Bukan Pembohongan Publik", melainkan lebih bisa dianggap "Kenekatan Teknis" Vendor, dengan asumsi bahwa My403 benar menggunakan MSM8225. Meskipun informasi publik setiap device yang bisa dilihat pada "Setting > about phone" MSM8225..." diletakkan dibawah item "Serial Number".

  3. Nilai Komersial
  4. My403, dengan Harga ( July 2014) pada kisaran 1.000.000 rupiah, Screen 4.5 Inch, System Operasi Android 4.0.4 Ice Cream Sandwich, RAM 768 MB, Internal ROM 4GB, Kamera 8 MP, battery 2.000 mAh tergolong cukup bisa bersaing. Sekali lagi dengan Asumsi My403 berplatform MSM8225 ... dimana daftar device yang menggunakan Platform tersebut adalah : HTC Desire 500, HTC 606w, Samsung Galaxy Win, HTC Desire 600, Huawei Ascend G525 dengan Harga di Pasaran lebih dari "dua Kali My403" harusnya My403 Laris manis.

  5. Casing
  6. Bahan dasar casing My403 berupa Plastik, harus diakui fabrikasi casing sangat bagus, membawa tampilan elegan, dengan Desain yang tidak diragukan lagi, mendompleng Popularitas "Aple iPhone 4/4s. Fabrikasi casing bahan Plastik pada My403 secara keseluruhan sangat bagus dan layak dapat bintang. Satu - satunya kelemahan adalah pada "Battery Door" . Petunjuk "cara membuka battery door, tertempel pada bagian belakang setiap batang device", namun tidak mudah dipahami. Kesalahan dalam membuka battery door akan berakibat fatal, kait pengunci terlihat sangat lemah, diduga bila terlalu sering dibuka (misal 25 kali buka > tutup> bisa jadi battery door akan tidak kuat lagi mengunci battery, meskipun battery sendiri tidak tergantung oleh battery door ini, artinya device ini akan aman bila dioperasikan Tanpa Battery Door ..... :)


  7. SIM Slot
  8. My403 didukung "Dual Sim" GSM-GSM(WCDMA), Slot 1 Mini SIM mendukung komunikasi WCDMA/ 3G, sementara Slot 2 Micro SIM mendukung komunikasi GSM / 2G. Dengan tingkat Harga saat rilis, device ini patut dibanggakan. Teknik "lawas" yang masih berdaya guna, penjepit sim slot 2, harus diangkat untuk menempatkan SIM dengan cara "Geser Angkat"


  9. Performa
  10. Banyak USER, penasaran dengan Versi Android, mereka berpikir Android 4.0.4 lebih baik dibanding Android 2.3.7. Perlu dipahami, setiap Perangkat Lunak ditulis sesuai dengan Kapasitas Perangkat Keras , sangat tidak bijaksana melakukan instalasi Perangkat Lunak pada Perangkat Keras yang tidak mampu mendukungnya, karena akan berakibat Fatal, dimana device mungkin saja Tidak dapat Beroperasi dengan baik. My403 dengan Android 4.0.4 beroperasi dengan baik, RAM 768 MB, cukup mampu melayani sebagian besar pengguna dengan pemanfaatan SmartPhone untuk : "Voice Call, Texting (sms), Sosmed FaceBook, Twitter, Chat : BBM, WhatsApp" (WhatsApp, Line, WeChat adalah sejenis, ada baiknya user memilih salah satu aplikasi saja agar tidak memberatkan cache di RAM) Selain WhatsApp yang berbayar (USD 1 per tahun), chat app lain menjual Iklan, ini akan sangat memberatkan "RAM cache"

  11. Desain dan Tampilan
  12. Tidak dapat diragukan, MyPhone My403 Zenith Series, memiliki Desain dan Tampilan sangat menggiurkan. Terutama warna Putih dengan "Aksen Metalik", ide dan fabrikasi brilian untuk Pencontekkan yang sungguh Tidak Terhormat. Semestinya Intertec bila benar-benar terlibat dalam proses produksi, seharusnya tidak perlu melakukan penjiplakan Design secara kasat mata. Akan tetapi boleh jadi keputusan menjiplak desain iPhone 4 ini akan memperlanjar Penjualan, karena sebagian (Terutama) Masyarakat Indonesia tidak peduli dengan hal tersebut, atau bahkan "Bangga" menggunakan "iPhone Jiplakan". Device ini sangat cocok buat "Para Hedonis Berkantong Tipis"

  13. Android Tweaker
  14. Buat para Android TWEAKER, maupun Penggemal Rom Flashing Festival, alias Opreker, Device ini sangat menantang, karena perlu disibak Jatidirnya. Kecuali Intertec bersedia membuka diri, apa sebenarnya yang mereka Jual .... wkwkwkwkw. Dengan Android Debugging Aktif, adb daemon tidak mengenalinya, Penulis belum mengetahui bagaimana mencapai "Development Option" untuk device ini, sesuatu yang umum dan mudah dipahami para Tweaker bahkan paling pemula sekalipun. Kekhawatiran penulis adalah Inrtertec ( bisa sengaja bisa tidak ) Terlibat dalam Pembohongan Publik dengan memanipulasi Data Hardware Platform. Atau Intertec Korban dari perbuatan Pabrikan OEM, yang tidak bertanggung Jawab. Apakah Vest GuoHong Communication & digital Information Co Ltd ikut bertanggung Jawab ?

Selamat Lebaran 2014 .... mohon maaf lahir dan bathin

Apr 2, 2014

MTP, Jmtpfs.

Udev is nice thing on linux today. At the time of android coming up, the device running linux kernel , but somehow android device does not so " friendly " with linux machine. Especially for daily use in accessing file inside the phone. Old time android, the phone just act as " usb storage " thus no single problem accessing file inside by linux machine. Today, phone with more ( internal ) storage available in market, commonly budget phone serve 8 GB internal storage, most market dominated with 16 GB internal storage, 32 GB storage in phone is premium and 64 GB storage is " special ". Since then, phone vendors introduced phone utilized MTP ( Media Transfer Protocol ), a protocol to transfer media file easier, and the most advantage, to syncing between device and pc. However, mounting MTP device on linux is troublesome. Luckily, some independent developers, investing their time, energy and knowledge to help linux users. One of github user nicknamed kiorky have good sources for JMTPFS for Linux

Get Jmtpfs
Ubuntu 14.04 provide Jmtpfs package on universe repository. It is easier to install >:

>$ sudo aptitude install jmtpfs
However I faced problem in mounting Xperia ZR C5502 as mtp device by using jmtpfs on ubuntu repos . I have NOT made any other investigation, in fact mounting MTP device by using jmtpfs from repository need " sudo " previllege, and not really works.

Looking arround and found kiorky/jmtpfs on github , decided to pick her up > :
[~]
>$ git clone https://github.com/kiorky/jmtpfs.git
Cloning into 'jmtpfs'...
remote: Reusing existing pack: 82, done.
remote: Total 82 (delta 0), reused 0 (delta 0)
Unpacking objects: 100% (82/82), done.
Checking connectivity... done.
[~]
>$
[~]
>$ cd jmtpfs
[~/jmtpfs]
>$./configure --quiet

if you were no see any ERROR message than everything fine

[~/jmtpfs]
>$make --quiet


cd . && /bin/bash /home/x1123/jmtpfs/missing --run automake-1.11 --gnu
/home/x1123/jmtpfs/missing: line 52: automake-1.11: command not found
WARNING: `automake-1.11' is missing on your system.

CDPATH="${ZSH_VERSION+.}:" && cd . && /bin/bash /home/x1123/jmtpfs/missing --run autoconf
/home/x1123/jmtpfs/missing: line 52: autoconf: command not found
WARNING: `autoconf' is missing on your system.

got TWO WARNING ... just install missing package

[~/jmtpfs]
>$sudo aptitude install autoconf automake

and repeat make command.... (after package installation finished)

[~/jmtpfs]
>$make --quiet
Making all in src

and finally execute > :
[~/jmtpfs]
>$ sudo make install --quiet

unless you sees warning or error messages ... everyting should be find


Jmtpfs Usage

  • Connect your android device to computer via usb port
  • set usb connection on device to MTP
  • Make mount point >$ mkdir ~/mtp ( or whatever you wants like ~/xzr )
  • Finally execute as user >$ jmtpfs ~/mtp [enter]
  • android device should be mounted at ~/mtp


  • To unmount execute >$ sudo fusermount -u ~/mtp

  • INTERESTING IN UBUNTU 14.04 for XPERIA ZR device
  • device have been automount by CAJA upon connected :-))

Thus NON Root user can UNMOUNTED easily

Unfortunatly, IT'S NOT AUTOMOUNT for XIAOMI MI3W device :-))

Need to execute :
>$ jmtpfs ~/mtp
To mount XIAOMI MI3W


Sorry I DONT KNOW WHY ....


Fastboot without Sudo

Because of Gentoo set Gnome-3 as stable. I got hassle by black screen on GDM. Spent one and half day can not resolve the case. I wipe gentoo system and pick FUNTOO up, merged Mate-Desktop along with XFCE-4.10 :-) everything just fine. Setting-up all necessary for poking android beast device and rom.
Faced annoying problem with fastboot , when fastbooting on user mode, got no permission messages. I used fastboot from Adt Bundle , stored at :
/ahu/adt-bdlx86_64

Exported the PATH > on [dot]bashrc
export PATH=/ahu/adt-bdlx86_64/sdk/platform-tools:$PATH

Udev rules " properly " set-up
## /etc/udev/rules.d/51-android.rules

# SAMSUNG GALAXY NEXUS GT-i9250 FASTBOOT
SUBSYSTEM=="usb", ATTR{idVendor}=="18d1", ATTR{idProduct}=="4e30",
MODE="0666", GROUP="plugdev"


## username x1123 member of group plugdev

># gpasswd -a x1123 plugdev

I CAN NOT use sudo with above set, thus copied " fastboot and adb" to " /usr/local/bin " to enable using " sudo ", commented exported PATH > :

# export PATH=/ahu/adt-bdlx86_64/sdk/platform-tools:$PATH

It's works !!!.
Well, no good idea, have to use " sudo " for fastbooting, something must be wrong.


Solution
After couple of experiments, toke gunshot advise from internet. No lucks. One works is editing /etc/udev/rules.d/51-android.rules to be :

## /etc/udev/rules.d/51-android.rules

# SAMSUNG GALAXY NEXUS GT-i9250 FASTBOOT
SUBSYSTEM=="usb", ATTR{idVendor}=="18d1", ATTR{idProduct}=="4e30",
MODE="0666", GROUP="plugdev", OWNER="x1123"


Uncommented file ~/[dot]bashrc
export PATH=/ahu/adt-bdlx86_64/sdk/platform-tools:$PATH
removing adb and fastboot >$ sudo remove /usr/local/bin/adb /usr/local/bin/fastboot

Loged Out and Loged In again :-)

Everyting back to "Normal"

15:19:32 [~]
x1123@ /> adb devices
* daemon not running. starting it now on port 5037 *
* daemon started successfully *
List of devices attached
014E0F5212008010 device

15:19:40 [~]
x1123@ /> adb reboot-bootloader
15:19:47 [~]
x1123@ /> fastboot devices
014E0F5212008010 fastboot
15:20:01 [~]
x1123@ />fastboot reboot
rebooting...

finished. total time: 0.005s
15:29:02 [~]
x1123@ />

Apr 1, 2014

Ubuntuist - Completely

Testing shinny Ubuntu 14.04 amd64 is really cool, it's considering NOT stable, but very usable. I have been GOOGLIST for a long time, trapped into " google jail " by using, google, email account, online contact, google drive, blogger, google-chrome, android smart phone . I have been looking for alternatives, at least for smart phone, I can either pick windows phone, Firefox OS, ubuntu touch up, and browser. Well, I can say google-chrome is innovative web browser, at least on design, simple and clean. Any other web-browser look like, following google design. Just see the metaphore of Firefox Design, Internet Explorer, Epiphany. Ubuntu introducing new comer ( from gnome 3 camp I Think ), a shinny WEBAPP , the Name is vague why they did not named i.e "Columbus, Voyager or other more sexier name "

Browser / webapp

Minimalis browser is default browser running on ubuntu touch. No released device "yet" up to the point of time this article published, but development preview lives on many of Nexus Devices : Maguro, Mako, Hammerhead. This webapp running very nice on ubuntu 14.04 amd64 (x86) platform. Seems ubuntu working hard to port an Hybrid app for all devices, PC, SmartPhone, Tablet. Currently I used epiphany the gnome web-browser, which renammed to web and the sister named "Browser"


Flash Galaxy Nexus with Ubuntu Touch

No doubt, the best way to flash Nexus Devices with " ubuntu touch " is using ubuntu linux distro. Zero tweaking, Null configuration, almost straight forward. No linux or developer skill needed, just a will to read many of tutorial on the web, super dupper easy, unless to wanna to flash Non Nexus Devices, then a work hard is must.
Prepare to Install Required Flashing Tools
Presumed it is on ubuntu 14.04 , open terminal, ensure main universe ubuntu repository is enable use nano or other preffered test editor :
execute on terminal : $ sudo [space] nano [space] -w /etc/apt/sources.list [enter]
if you see like this, you are safe

### /etc/apt/sources.list

deb http://archive.ubuntu.com/ubuntu/ trusty universe


if you see different, i.e like this
### /etc/apt/sources.list

# deb http://archive.ubuntu.com/ubuntu/ trusty universe


Please edit, uncomment [delete sign # before word deb] and save

Install Required Flashing Tools
Execute on the terminal :


>$ sudo [space] aptitude [space] update [center]
>$ sudo [space] aptitude [space] install [space] phablet-tools [space] ubuntu-device-flash [enter]


Flashing Ubuntu Touch on Galaxy Nexus
Situation


.... ENSURE YOUR DEVICE BOOTLOADER MUST BE UNLOCKED ....
.... BEFORE FLASHING ANYTHING ....


If your device running android, connect device to ubuntu machine with usb debugging enable : ON DEVICE setting > developer option > usb debugging enable and execute on terminal :

>$ adb [space] devices [enter]
# if you see :
List of devices attached
014E0F5212008010 device

YOU ARE SAFE ... mean connection between phone and pc is going well... proceed


Execute on Terminal :

$ adb [space] reboot-bootloader [enter]


Your device will reboot into bootloader state


If your device bootloader on LOCKED state,
please unlock before flashing


To Unlock bootloader
Set Phone on bootloader/fastboot mode ( above )
Execute terminal command

>$fastboot [space] oem [space] unlock [enter]

ON PHONE
Choose ACCEPT ( use volume button to choose and power button to confirm )

... Phone will rebooting
After phone on device state ( booting Android )
Execute again terminal command to set phone into bootloader
>$adb [space] reboot-bootloader[enter]

While device on bootloader state, let start the fun execute on terminal :

>$ ubuntu-device-flash [space]--device=maguro [space] --channel=saucy-customized [space]--bootstrap [enter]
.. YOU WILL SEE something

269.80 MB / 269.80 MB [======================================] 100.00 % 580.85 KB/s
2014/04/01 16:01:32 Start pushing /home/x1123/.cache/ubuntuimages/pool/ubuntu-
d089ad76802f5698cfb0acadfe9e441a56a5fbe3af6f0df4e099398910e84212.tar.xz to device


Just wait, relax and take some coffee or lemonade, it will takes couple minutes/hours depending on your internet speed

After you see on terminal : something like

2014/04/01 16:02:22 Created ubuntu_command: /home/x1123/.cache/ubuntuimages/ubuntu_commands219979904
2014/04/01 16:02:22 Rebooting into recovery to flash


YOUR DEVICE TURNING INTO > Recovery Mode and Flashing Mode :


Just wait about 30 minutes, device will booting herself INTO UBUNTU TOUCH


THATS IT

After the phone running Ubuntu Touch. Just test all available channels by executing on terminal ( Phone booting on ubuntu touch and connected to PC via usb port )

>$ ubuntu-device-flash [space]--channel=CHANNEL NAME[enter]
>$ ubuntu-device-flash [space]--channel=saucy-proposed-customized[enter]


List of Available Channels
Stable
saucy
saucy-customized
saucy-proposed-customized
saucy-proposed-customized-generic
saucy-surfaceflinger

Devel
trusty
trusty-customized
trusty-proposed
trusty-proposed-customized
trusty-proposed-customized-generic


.... NOW YOU ARE JAILED BY UBUNTU ....

Mar 31, 2014

Mate Desktop 1.8 on Ubuntu 14.04 base system

After BOOTSRAPING UBUNTU 14.04 BASE SYSTEM succesfully. I wish to Install New Comer but Old Stock MATE DESKTOP 1.8 and following Guid by IT-World
We can do it by copy paste. I do it on base system fresh bootstraping. :)

For sure everything is about Terminaling ... LOL


sudo add-apt-repository "deb http://repo.mate-desktop.org/archive/1.8/ubuntu $(lsb_release -cs) main"
wget -q http://mirror1.mate-desktop.org/debian/mate-archive-keyring.gpg -O- |
sudo apt-key add -
sudo apt-get update
sudo apt-get install mate-core mate-desktop-environment mate-notification-daemon


sudo apt-get install lightdm


THAT'S IT

I wish to test webbroser app along side by side with epiphany-browser both look amazing on Mate Desktop 1.8


Testing Ubuntu Touch Devel Channel

Ubuntu 14.04 is best tools to test ubuntu touch on Nexus Devices. I tested for Galaxy Nexus GT=i9250 Maguro Device.
Just install by using : # aptitude install phablet-tools ubuntu-device-flash will grab all neccessary dependecies, to flash Maguro with ubuntu touch.... folow THIS UBUNTU WIKI straight forward.


Strange ADB and FASTBOOT by Ubuntu :-)

During installing phablet-tools and ubuntu-device-flash ubuntu repos gave android-tools-adb and android-tools-fastboot packages installing straight to /usr/bin/*


I have no problem with this ADB and FASTBOOT to flash Galaxy Nexus however when a Xiaomi Mi3 WCDMA phone connected to pc and checking with :


16:04:36 [~]
x1123@ >$ adb devices
List of devices attached


... (NOTHING)

<

I have Android SDK installed on part of adt-bundle and tested with this ADB

16:13:24 [/ahu/adt-bdlx86_64/sdk/platform-tools]
x1123@ >$ ./adb start-server
* daemon not running. starting it now on port 5037 *
* daemon started successfully *

16:13:30 [/ahu/adt-bdlx86_64/sdk/platform-tools]
x1123@ >$ ./adb devices
List of devices attached
9d4aae4d unauthorized


Then I moved this ADB and FASTBOOT to replace ubuntu's one : # sudo cp adb fastboot /usr/bin/

Ubuntu 14.04 Intsalling Base System without Medium

ubuntu 14.04 on beta stage on 30th/March/2014 . Considering long time I did not in touch with ubuntu, and this week end I wish to give ubuntu 14.04 a try, well this will be next LTS. Best way to install ubuntu, by downloading cd-image, burn and installing. But I face some situation, can not do such way
  • I have no dvd medium to burn ubuntu-14.04-iso ( ubuntu iso size is about 984 mb and I have only 700 mb CD)
  • I wish to install minimum applications : base system, internet browser, phablet-tools, office suite, graphic editor (gimp & inkscape), image viewer, pdf viewer. archive manager, music player
  • Mate Desktop Environment
  • Some android rom build tools

My Situation

  • Have a funtoo amd64 live on a partitions
  • 2 TB Hard disk ( I can serve about 30 GB for ubuntu )
  • Good Internet connection


Thus bootstraping ubuntu base system is the best choice for me, and it is supper dupper easy. No need special skill in linux. Everybody can do it while listening music, or browsing internet for find thousands of help.I run from live funtoo

  • Open Terminal
  • Prepare the disk, serve a partition for ubuntu. I made 30 GB on /deb/sda10
  • Create ext4 systemfile : # mke2fs [space] -t [space] ext4 [space] -L [space] ubuntu [space] /dev/sda10 [enter]
  • Create mount point mkdir /ubuntu and mount the partitions # mount /dev/sda10 [hit-space] /ubuntu [hit-enter]
  • Execute command on terminal : debootstrap [space] --arch [apsace] amd64 [space] trusty [space] http://archive.ubuntu.com/ubuntu [enter] depending on the internet connection speed, its take about 15 minutes

Chrooting

After completing debootstraping debian/ubuntu base system, we need to continue installing Kernel, tweaking fstab file and setting boot loader. Thats all what we need to boot ubuntu base system and build up further on the real-system

  • # cp [space] -L [space] /etc/resolv.conf [space] /ubuntu/etc/ [enter] hit Y if being asked (This for copying file resolv.conf from live linux to new bootstraping ubuntu base system, in order to enable us connect internet in chroot environment)
  • # mount [space] -t [space] proc [space] none [space] /ubuntu/proc [enter]
  • # mount [space] --rbind [space] /sys [space] /ubuntu/sys [enter]
  • # mount [space] --rbind [space] /dev [space] /ubuntu/dev [enter]
  • # chroot [space] /ubuntu [space] /bin/bash [enter]
  • welcome to ubuntu chroot environment
  • TEST INTEERNET CONNECTION
  • # ping [space] -c [space] 3 [space] google.com [enter]
  • If you were see something unknown host google.com on terminal output, you face trouble, No Internet connection. check your internet stuff. Otherwise you see :
  • 64 bytes from fm-dyn-111-94-248-182.fast.net.id (111.94.248.182): icmp_seq=1 ttl=62 time=9.67 ms
  • 64 bytes from fm-dyn-111-94-248-182.fast.net.id (111.94.248.182): icmp_seq=2 ttl=62 time=10.0 ms
  • 64 bytes from fm-dyn-111-94-248-182.fast.net.id (111.94.248.182): icmp_seq=3 ttl=62 time=33.9 ms
  • Then you are safe to continue.

In chroot environment

  • Execute comand : # apt-get [space] update [enter]
  • ubuntu will show something connection with repository archive.ubuntu.com . To connect directly to archive.ubuntu.com is recommended rather than closer mirror, since the beast is in beta stage.
  • Install aptitude which is more handy than apt-get : # apt-get [space] install [space] aptitude [enter]
  • After installing aptitude you can compare between apt-get vs aptitude by executing apt-get --help and aptitude --help
  • Edit /etc/fstab file with nano text editor execute # nano [space] -w [space] /etc/fstab [enter] If you were face output nano : command not found . Install nano by executing # aptitude [space] install [space] nano [enter] after complete installing, repeat above command. Empty file will appear


Items on /etc/fstab file ( we need to type on by hand )

# file system
mount point type options dump pass

Edit the file to looklike


/etc/fstab
# file system
/dev/sda10
mount point
/
type
ext4
options
defaults
dump
0
pass
1

Now we have very basic /etc/fstab file to enable kernel mounting root file system to boot on real-system. we can tweak later as root after booting on real system

Install Appropriate Kernel

  • check kernel availability, # aptitude [space] search [space] linux-image [enter]
  • choose desired kernel
  • # aptitude [space] install [space] linux-image-3.10.0-20-generic [enter]
  • Critical
  • Since ubuntu also grab to install BOOTLOADER automatically when we installing kernel. We need to be ready to install grub (today popular linux bootloader)
  • It is generally safe to install GRUB BOOTLOADER at MBR ( usually /dev/sda ) ubuntu OS-Probber smart enought to detect all operating systems in your computer. but it will be different scenario if your system is EFI system This beyond the scope of this article
  • My scenario : DID NOT INSTALL GRUB BOOTLOADER due to I wish live funtoo will manage the bootloader
  • If you wish different, by installing GRUB bootloader, recommended to install at mbr /dev/sda

  • something like
  • [*] /dev/sda and hit enter / OK

  • give root a password before rebooting (otherwise you can not login on real system) by executing : # gpasswd [space] root [enter]
  • key in appropriate password (system will ask twice

  • By default, ubuntu exploiting sudo too much. Thus good idea to add a user for daily use in this CHROOT environment, to enable us logging-in as a user and use sudo to have root previllege
  • Excute : # useradd [space] -m [space] -g [space] users [space] -G [space] root,sudo,admin,video,audio,cdrom [space] -s [space] /bin/bash [space] johny [enter]
  • To know what are meaning of above command execute useradd [space] --help [enter]
  • Give user johny a password : # passwd [space] johny [enter]
  • key in your desired password string

NOTE : I used wired internet connection, thus no problem without configuring Network Tools, for someone using wireless. Have to configure proper networking

Install Wireless Tools # aptitude [space] install [space] wireless-tools [enter]

Install wpa_supplicant # aptitude [space] install [space] wpa_supplicant [enter]


Ready to Go

Execute : # exit [enter] We exiting CHROOT environment. Manage live linux system to boot fresh ubuntu base syetm.

  • If you use populer linux distros like LinuxMint, Fedora, Opensuse just execute $ sudo update-grub will add new ubuntu system into bootloader options
  • I use Funtoo, and need to poke file /etc/boot.conf

...

"Ubuntu 14.04" {
scan /ubuntu/boot
kernel vmlinuz-3.10.0-20-generic[-v]
initrd initrd.img-3.10.0-20-generic[-v]
params root=/dev/sda10
} ...


Execute : # boot-update [enter] THAT'S IT ... rebooting machine will have ubuntu 14.04 option to boot.

If you were face can not log-in, after booting into ubuntu real system on fresh install, it's probably beta BUGS. Options we can take is to bootstrap lower release like : precise (12.04), Quantal (12.10), Raring (13.04), Saucy (13.10) and upgrade to trusty after booting real-system. Upgrading the base system is safe in all scenario


Booting Real System

I was safe booting into real system as user and connecting internet with $ sudo dhclient eth0

INSTALLING MATE-DESKTOP 1.8 on UBUNTU 14.04 base System

Mar 26, 2014

Lenovo B320 a work Horse

Week 11th/2014, it was really annoying. Dunno why, suddenly my work-horse Lenovo B320 with Gentoo Linux amd64, where bloated Gnome 3 sit, can not boot into GUI. The box went to Gnome 3, since Gentoo Developer "Marked" Gnome-3 as stable. I have been long time gnome fans, for desktop environment. I believed to developer, respect to them who have been spending so much energy and time to develop Gnome 3. Gnome 3 is great to welcome "New Era" of Desktop, Tablet and Pad :-) Gnome 3 is probably very good to run on touch devices. Well, my work-horse is still on "Old Style" with legendary "Mouse" and "Physical Keyboard". Now Gnome 3 can not boot, spent almost day and half along with googling, no lucks. I need a lot desktop and office suite to support my job in running shipping company, but also need the box to serve a hobby to tweak smart phone, compiling android and write android app for personal use
Finally decided to wipe Gentoo System and picked up her little sister, Funtoo. Funtoo developers, served very nice Profile and help a lot to common users to set their machine up, without deep knowledge of Linux system. Funto online guide is also very good, and it's gentoo, thus everybody can refers to gentoo guide
Machine Details
Came in April 2012 from retailer without Operating System, (this have been my choice in buying PC since in touch with linux). Usually retailer will give a discount @ USD 70 - 80 for accepting box without operating system.
  • 00:19.0 Ethernet controller: Intel Corporation 82579V Gigabit Network Connection (rev 05)
  • 01:00.0 VGA compatible controller: Advanced Micro Devices [AMD] nee ATI Caicos [Radeon HD 6400 Series]
  • 05:00.0 Network controller: Atheros Communications Inc. AR9285 Wireless Network Adapter (PCI-Express) (rev 01)
  • 02:00.0 Unassigned class [ff00]: Realtek Semiconductor Co., Ltd. RTS5209 PCI Express Card Reader (rev 01)
  • 00:01.0 PCI bridge: Intel Corporation Xeon E3-1200/2nd Generation Core Processor Family PCI Express Root Port (rev 09)
  • 00:1f.2 SATA controller: Intel Corporation 6 Series/C200 Series Chipset Family SATA AHCI Controller (rev 05)
  • vendor_id : GenuineIntel
  • model name : Intel(R) Core(TM) i3-2120 CPU @ 3.30GHz
  • cpu family : 6
  • model : 42
  • flags : fpu vme de pse tsc msr pae mce cx8 apic sep mtrr pge mca cmov pat pse36 clflush dts acpi mmx fxsr sse sse2 ss ht tm pbe syscall nx rdtscp lm constant_tsc arch_perfmon pebs bts rep_good nopl xtopology nonstop_tsc aperfmperf eagerfpu pni pclmulqdq dtes64 monitor ds_cpl vmx est tm2 ssse3 cx16 xtpr pdcm pcid sse4_1 sse4_2 popcnt tsc_deadline_timer xsave avx lahf_lm arat epb xsaveopt pln pts dtherm tpr_shadow vnmi flexpriority ept vpid
  • MemTotal: 16418744 kB


The System of Choice
  • Linux ... for sure
  • Distribution Funtoo amd64 current build
  • stage3-corei7-funtoo
  • Desktop Environment : xfce4 : 4.10

Set of Applications
  • Media :GIMP, Inkscape, Nomacs Image Viewer, Evince, Clementine Music Player, VLC Media Player
  • Text Editor : Leafpad, Vim
  • Internet Browser : Links, Forefox
  • Burning Tools Brasero, Unetbootin
  • Office Suite :LibreOffice
  • Accesories : Screenshot, Orage Calendar

Important System Point

  • Kernel Configs 3.13-7 (Gentoo Sources)
  • This must be merged with radeon-ucode or full linux-firmware for Video working flawlessly


  • Masked =sys-devel/make-4.0-r1 on /etc/portage/package.mask to enable system merged sys-devel/make-3.82-r4 (accepted by android rom build)
  • eselect python set to 2.7 (for android)
  • dev-java/icedtea-bin 6.1.12.7 is acceptable to build 4.4 ( KitKtat) android rom
  • merged emul-linux-x86-baselibs for Android build stuff to work

  • Android Related
    • Android ROM Sources (I set for Cyanogenmod and AOKP )
    • Android Studio and adt-bundle

    Real Multilib Userland on Linux

    Read multilib requirement on Android rom building and other stuff. About two years absent from getting rid with android rom. I have time to...